Android Application Security [chapter 0x2] - Introduction to Frida 2: OWASP MSTG crackme Level 1-3
Hello world!
Last time, we do little bit of experiment on how powerful frida could be used to aid our android pentesting analysis(post), however, it left us with a big question “whether we can use frida to tamper native library in Android or not ?”
Well! the answer is “YES! absolutely”
Thus, in this post I would like to continue this saga by trying to solve OWASP-MSTG challenge level 1 - level 3 using frida(link) and by going through this challenge, you will have good general idea how to used frida to analyse native library in Android.
Don’t worry the last two level will be cover in the next post because I don’t want to overwhelm and make you guys bored.
If you want just directly download the frida script, you can go to this github link
What is Android Native Library? Why you should care about it?
As you know, you can create Android Application by Java or Kotlin programming language, this language give you a good features to interact with underlying Android API to do a lot of cool stuff in you app. But there are certain cases, when you want to incoperate your app with lower level programming like C or C++ such as cryptography, openGL or any task that required intense memory management, this is where Android Native Library comes in.
A lot of people, thinks that this is a good place to stored a secret inside the application since you have to deal with assemblies and memory, but throughout of the post you will found out that given enough time and motivation hackers always find a way.
Android native library shipped along with the .apk file and stored in “/lib/” library if you try to decompile it with apktool and the file name usually have extension .so. Usually to make the native library can be implemented in a lot devices, developer tend to create several architecture version of the library such as x86, x86_64, armv7 and armv8.
Enough Talk Let's Go to Level 1
Generally all the challenges ask you to get the secret string or password inside the app but as the level increase it’s going to be more difficult to get the password since there are a lot of protection in the app.
There are two things that we need to do accomplished the first level:
-
Bypass the root detection;
-
Intercept the Decryption process to get the password.
1. Bypass the root detection
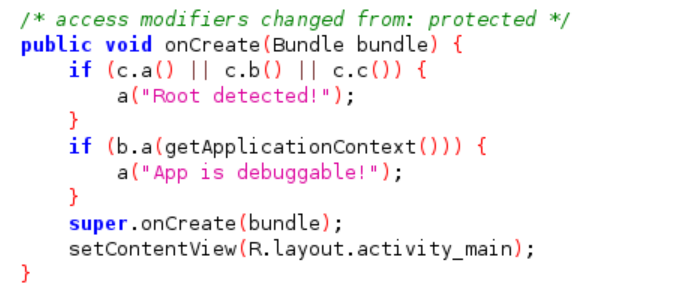
The following piece of code is the one that responsible to check if the app is installed in rooted device or not. You will find it in sg.vantagepoint.uncrackable1.MainActivity class in onCreate() method and as you can see it call another class named “c” located in sg.vantagepoint.a.c and used its function named “a”, “b” and “c”.
If you try to trace the root checking method, you will end up in this piece of source code:
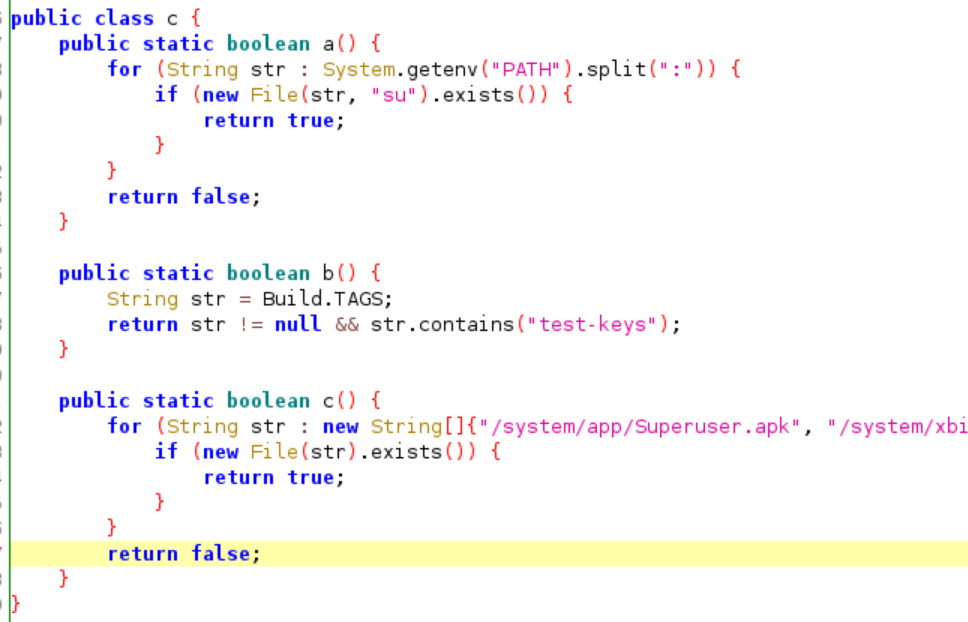
Each of this function return a boolean data type(true/false) if one of this check is true it will tell the application to exit. Thus, we will create a frida script that will intercept all of this function to always return false.
Java.perform(function(){
	var a_function = Java.use("sg.vantagepoint.a.c");
	a_function.a.implementation = function(){
		console.log("Tamper function a");
		return false;
	}

	a_function.b.implementation = function(){
		console.log("Tamper function b");
		return false;
	}

	a_function.c.implementation = function(){
		console.log("Tamper function c");
		return false;
	}

});
The script is pretty straightfoward, we attach frida to current thread of Java VM using Java.perform() and while attaching we tamper the previous mentioned three functions to make it always return false using Java.use().
We need to run the script at the beginning, you can achieve it using this command:
~# frida -U -l poc.js -f owasp.mstg.uncrackable1After that, frida will prompt you to type “%resume” inside the console to continue the execution. You should be able to navigate properly in the app without getting kicked.
2. Intercept the Decryption process to get the password

The following is the source code that trigger decryption process of the application. First, it starts by getting input that provided by user then passed to the other function which is “a.a” located at sg.vantagepoint.uncrackable1.a.
By visiting the file you will encounter the following source code:

The user input will be compare to an encrypted string that will be later decrypted by “sg.vantagepoint.a.a.a” function. There are two parameters that passed to it and by following the code we can see that the first paremeter is the key and the second parameter is encrypted text.

Now! we have a good understanding on how the program check whether we put the correct secret or not, so what sould we do? we can sniff the result of the decryption(“sg.vantagepoint.a.a.a” function)
Java.perform(function(){
	var a_function = Java.use("sg.vantagepoint.a.c");
	a_function.a.implementation = function(){
		console.log("Tamper function a");
		return false;
	}

	a_function.b.implementation = function(){
		console.log("Tamper function b");
		return false;
	}

	a_function.c.implementation = function(){
		console.log("Tamper function c");
		return false;
	}

	var plain_text_string = Java.use("java.lang.String");
	var enc_function = Java.use("sg.vantagepoint.a.a");

	enc_function.a.implementation = function(byte0, byte1){
		var plain_text_bin = this.a(byte0,byte1);
		console.log("Plain text: " + plain_text_string.$new(plain_text_bin));
		return plain_text_bin;
	}
});
First, we initialize two variables “plain_text_string” used to convert the decrypted string to a readable data, “instance.doFinal()” function will return a byte array. The second variable is to intercept the “sg.vantagepoint.a.a.a” function.
Next, we tamper the function and get the result by calling the original function “this.a(byte0, byte1)” and stored in temporary variable called “plain_text_bin”. We convert the result to a string by creating a new object you can do this adding “$new” and don’t forget to return the execution.
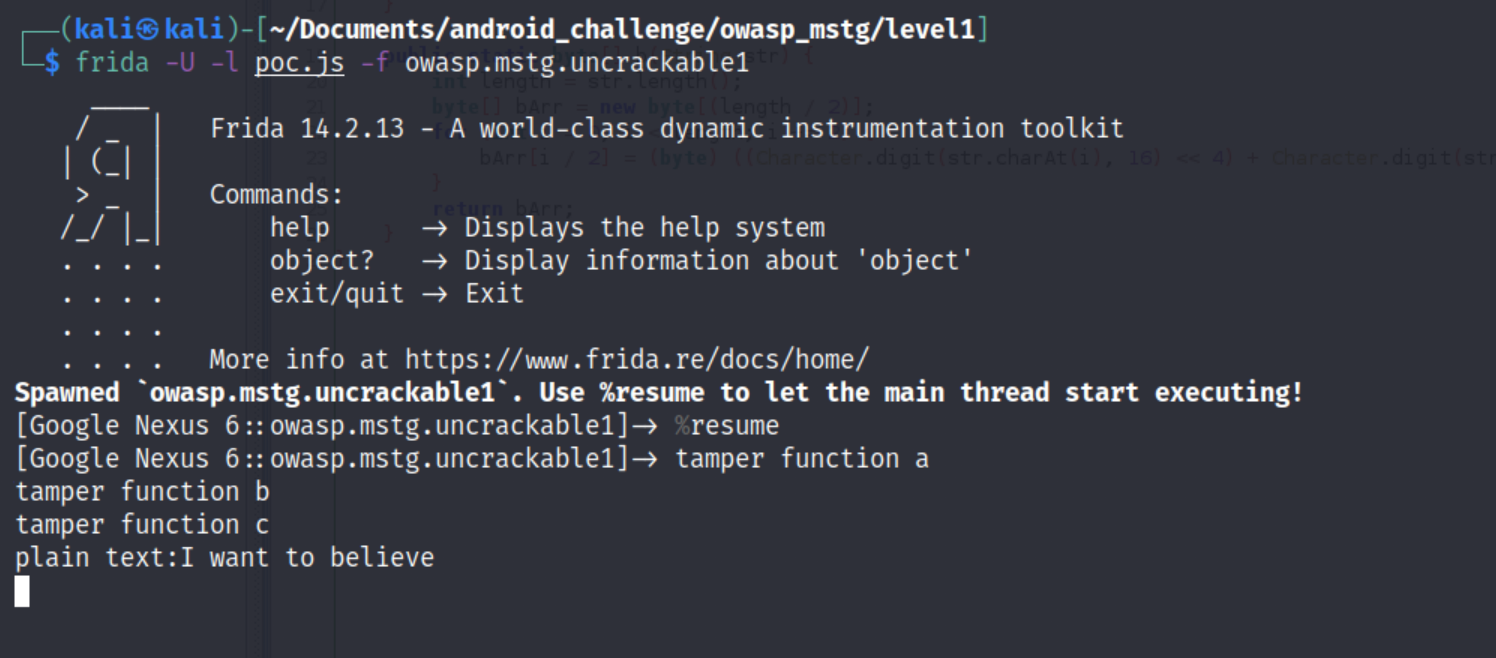
cool! we got the secret string, that’s a good warm up lets move to the main course.
Let's Go to Level 2
As I mentioned in the intro, the goal is still the same it’s to get the secret string from the App. Again, you have to bypass the root detection and reverse engineer the app but this time the input check is not in the android app but its in the native library.
1. Bypass the root detection
The approach is still the same with the previous level, but the root checking is moved to other file, thus, we need to update the script like this:
Java.perform(function(){
	var a_function = Java.use("sg.vantagepoint.a.b");
	a_function.a.implementation = function(){
		console.log("Tamper function a");
		return false;
	}

	a_function.b.implementation = function(){
		console.log("Tamper function b");
		return false;
	}

	a_function.c.implementation = function(){
		console.log("Tamper function c");
		return false;
	}

});
We basically just changed the function we want to intercept which is sg.vantagepoint.a.b this would be enough to bypass the root detection.
2. Understanding the Native Function
Before we begin to intercept the native function lets try to figure out the flow of the app. The decryption process starts when user submit a secret string to the app and this is the code that responsible for it(Located: sg.vantagepoint.uncrackable2.MainActivity):
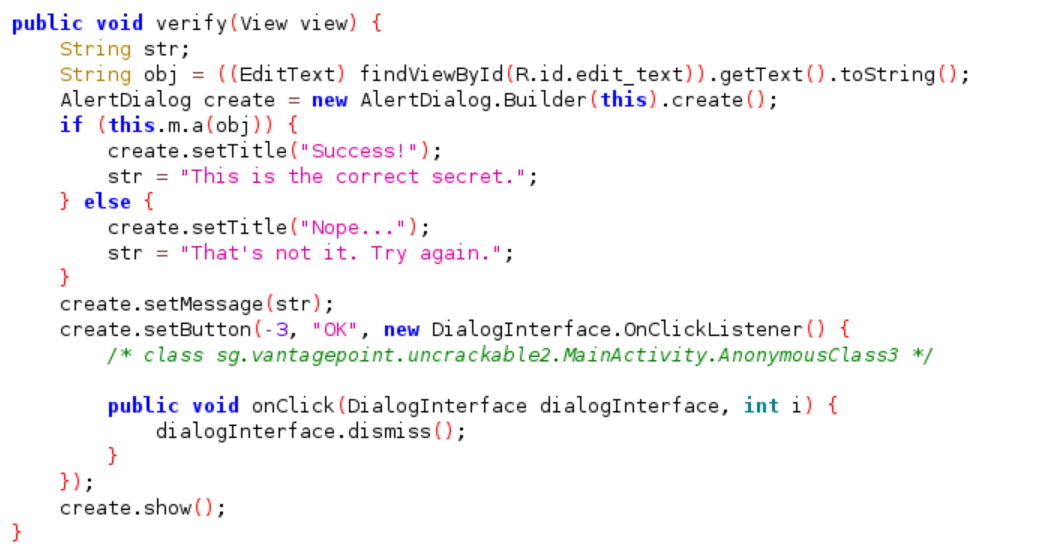
As you can see that our input is passed to this function “this.m.a(obj)”. Tracing the source of function, will lead to us this line of code(Note: this code is still in sg.vantagepoint.uncrackable2.MainActivity)

The m function is actually come from class named “CodeCheck”. But as you observed under the m function there is initialization of native library:
static{
	System.loadLibrary("foo");

}
If you ever found this type of code, this means that the app is using native library and its named is “libfoo.so”(this is the standard format used by android no matter what names you used for the native library it will be added lib at the beginning and .so as the extension)
Now lets jump to “CodeCheck” class to see the source code, like below:
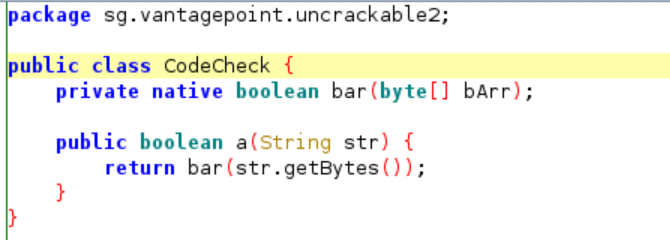
The class is responsible to check whether our input is correct or not but it used native function called “bar”(Notice the “native” keyword used in the initialization, this is how android bridging the native library to the app) it takes bytearray as the parameter and was used in a() function.
Let’s continue our analysis to the native library(libfoo.so file) and to get the corresponding file, you need to use tool like apktool to decompile the .apk file.
~# apktool d UnCrackable-Level2.apk -o level2_smaliThis is the command that I used and it will put all the result inside level2_smali directory. Go to the directory and you should find a “lib” directory that contain several other directories that correspond to each know architecture processor, in this case, since I used emulator with x86 arch I will go to the “x86” directory and reverse engineer the library.
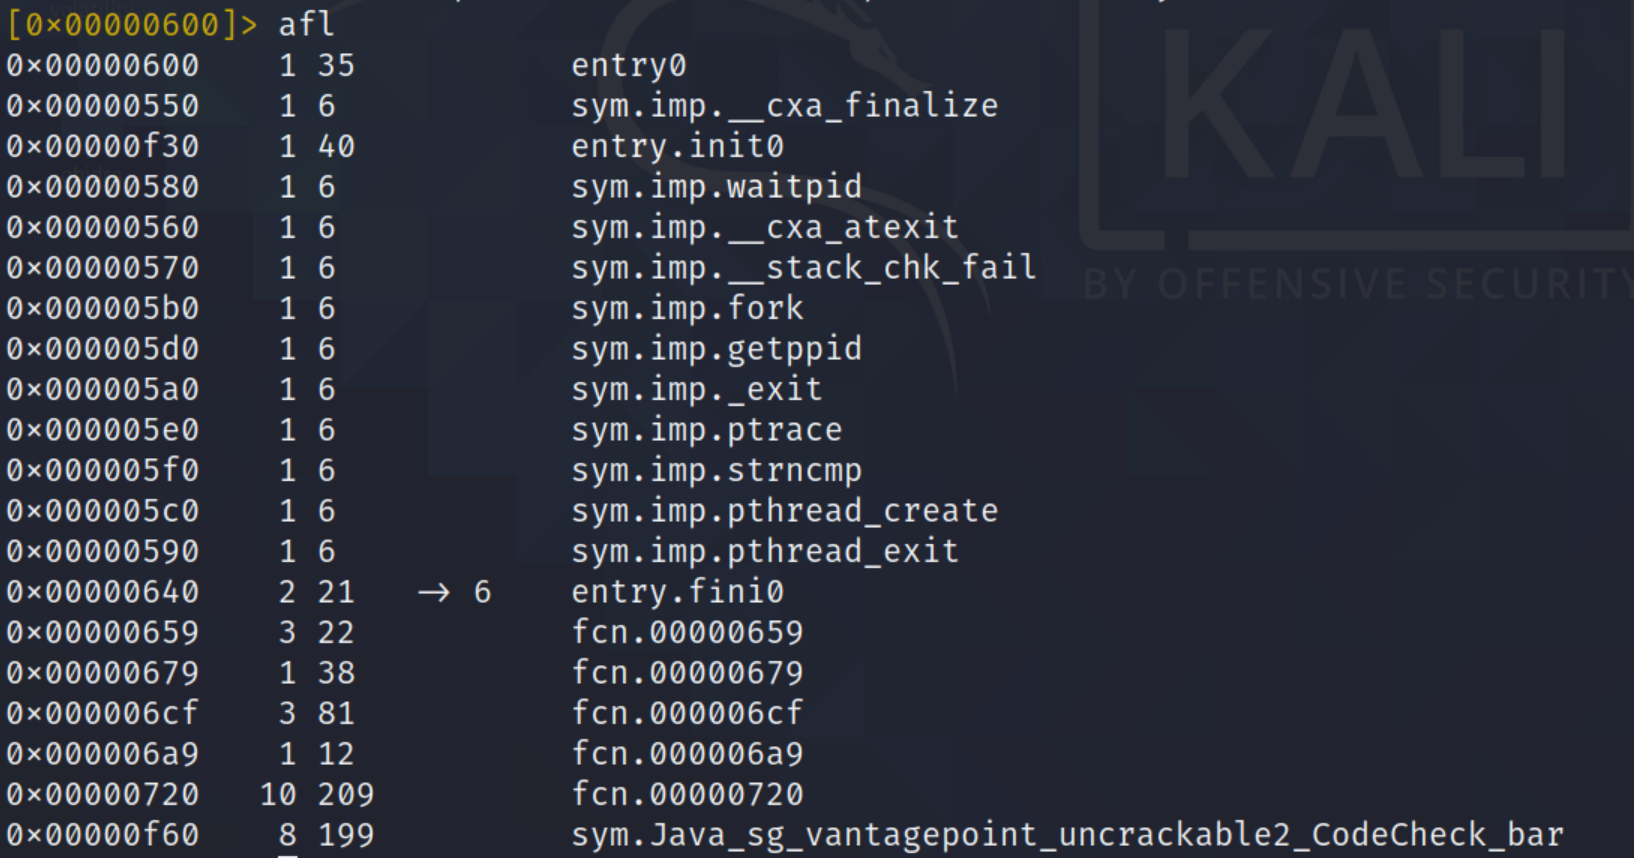
I used radare2 and looking at the functions list, there is an interesting function named “codecheck_bar” which is the true function that contain the actual of logic to check our input.
Roughly this is the logic of the native function:
- The function prepare the secret string to be compared to our string. This is how assembly prepare long string, so they kinda put them together for every 4 bytes in the top of the stack.
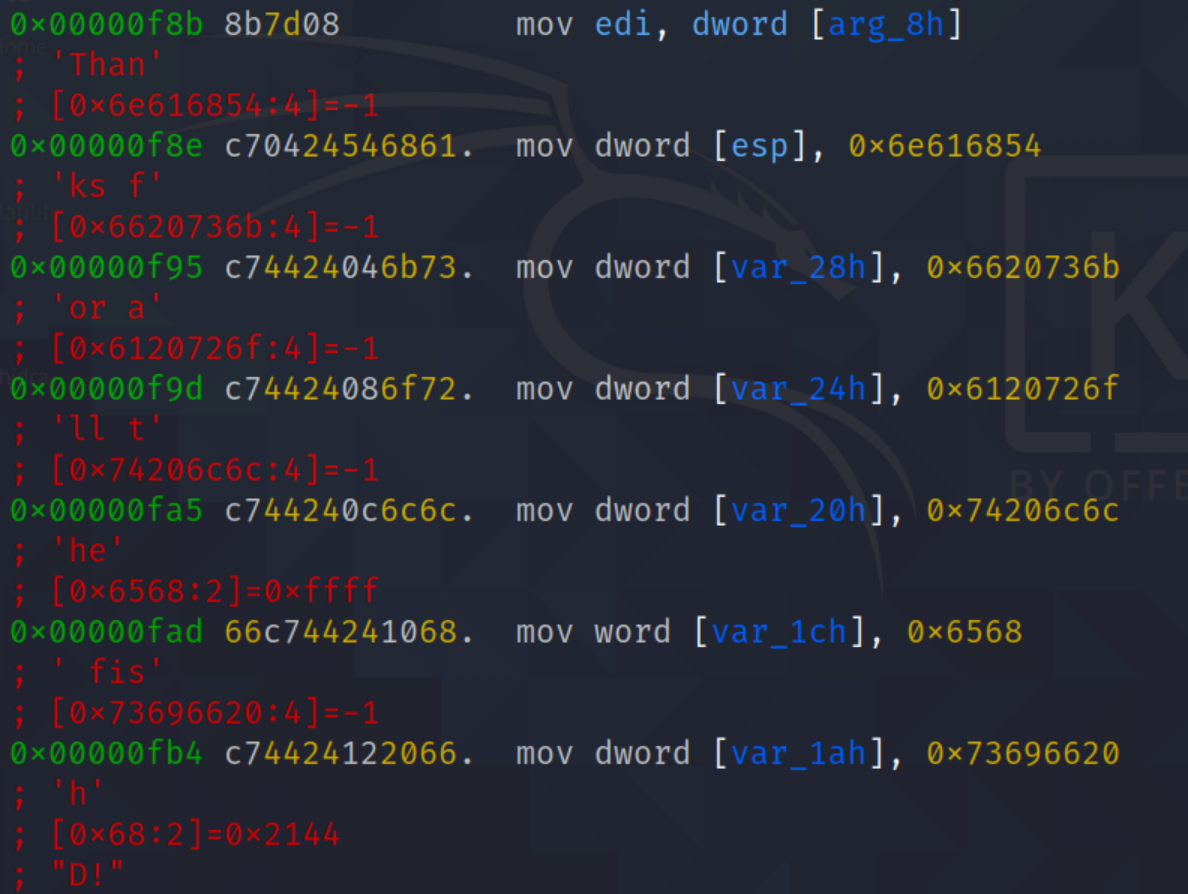
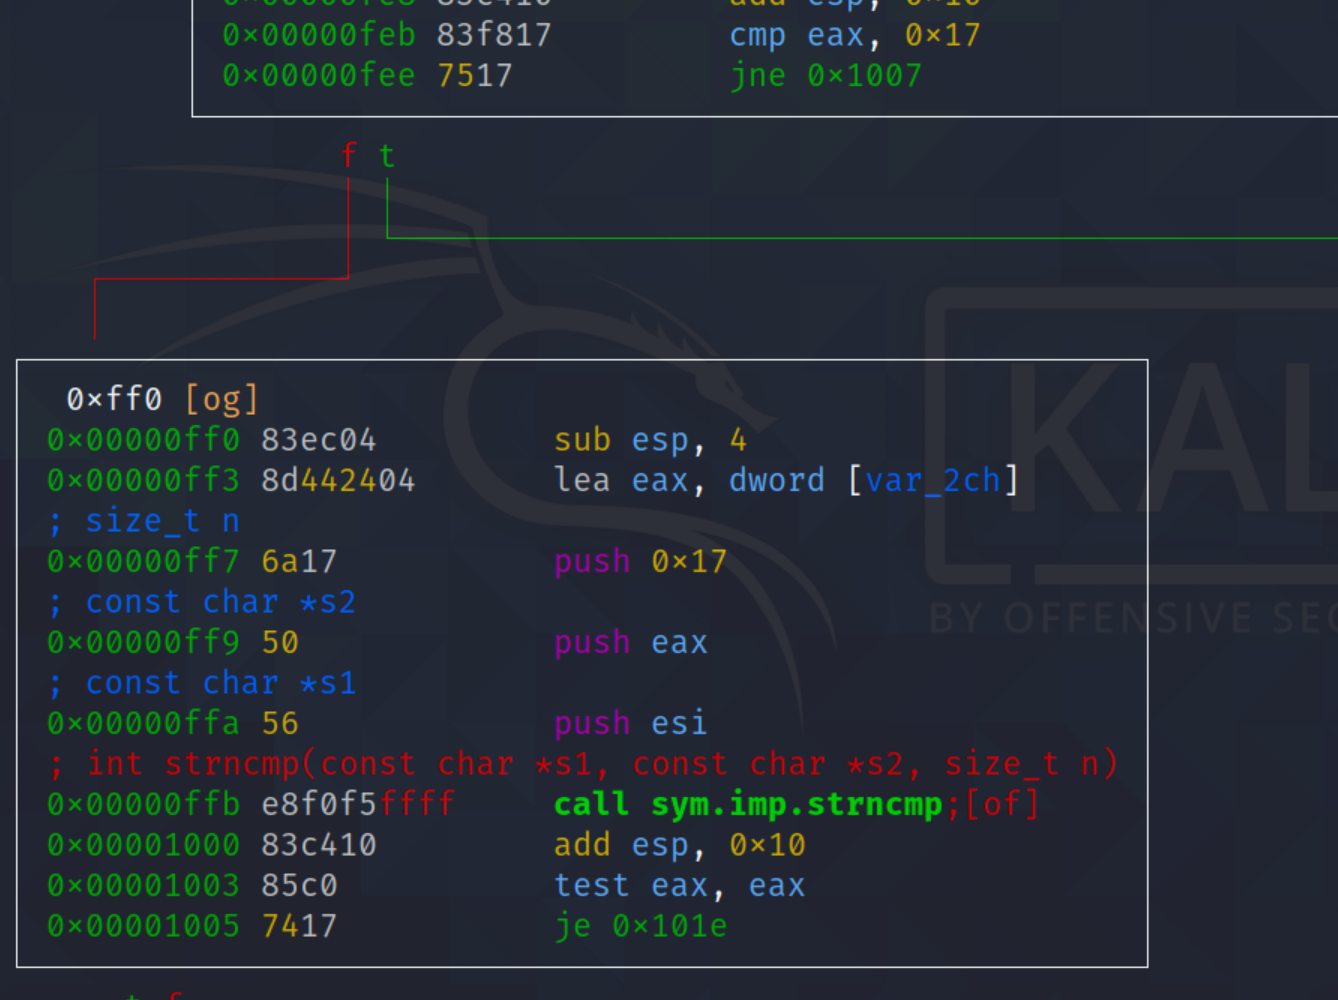
- The function check our function length whether its equivalent to 0x17(23)

- If its equivalent to 23 long it will be jump to comparison, the function compare our input using strncmp().
3. Intercepting the Native Function
Now that we have a clear picture on how the app work, lets try to intercept the native function to get the secret string. In frida you can use “Interceptor.attach”, however, you required to provide two paremeters:
-
Pointers to function that we want to intercept, in this case, it is the strncmp function
-
How do you want to intercept it.
You may tempted to satisfy the first parameters to just put the address of strncmp in the libfoo.so, 0x000005f0 judging from the reverse engineering result. But its not quite right, what you see there is just a relative address in order to get right pointer we need based address of the library when its loaded at runtime. We can do this by using “Process.enumerateModules”.

The following source code will alow to us to search through the app to find the location of libfoo.so base address. After we found the base address we can combine the source code with “Interceptor.attach” like the following:
Java.perform(function(){
        var a_function = Java.use("sg.vantagepoint.a.b");
        a_function.a.implementation = function(){
                console.log("tamper function a");
                return false;
        }

        a_function.b.implementation = function(){
                console.log("tamper function b");
                return false;
        }

        a_function.c.implementation = function(){
                console.log("tamper function c");
                findAddressStrncmp();
                return false;
        }

        function findAddressStrncmp(){
                Process.enumerateModules({
                        onMatch:function(module){
                                if(module.name == "libfoo.so"){
                                        console.log("Module Name: " + module.name + "-" + module.base.toString());
                                        Interceptor.attach(module.base.add(0x000005f0),{
                                                onEnter: function(args){
                                                        var str1 = args[0].readUtf8String(23);
                                                        var str2 = args[1].readUtf8String(23);
                                                        console.log("Our Input:" + str1);
                                                        console.log("Expected Input:" + str2);
                                                },onLeave: function(retval){
                                                        retval.replace(0);
                                                }
                                        });
                                }
                        },onComplete:function(){

                        }
               });

        }

});


});
So this is the flow of the frida script above:
-
We create a function named findAddressStrncmp() that contain our logic to intercept the strncmp() function and we want to used it after we tamper all of the root detection.
-
Inside the findAddressStrncmp() funciton we used Process.enumerateModules to allow us retrieved the based address of libfoo.so library automatically, once we got the right address we will move on to the “Interceptor.attach” function. We combine the base address and the strncmp() relative address by using module.base.add().
-
Once we passed the correct pointer It’s time to tamper the function. There are two modules of interest that you should know when using “Interceptor.attach”. “onEnter” useful when you want to get the passed arguments while “onLeave” useful when you want to tamper the return value of the function, in this case I make the strncmp() always return true.
Run the script with the following command:
~# frida -U -l poc.js -f owasp.mstg.uncrackable2
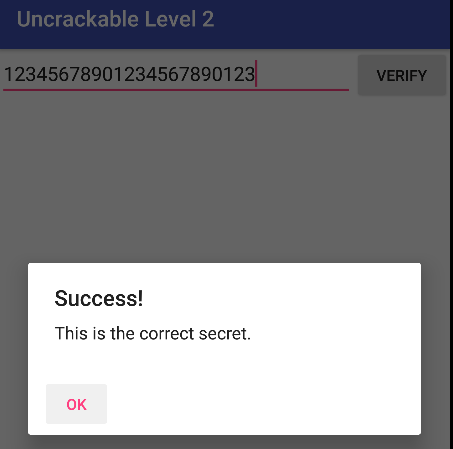
when you try to input the string make sure you make it to contain 23 characters, this could be automate with adb.

Wala! you get the secret string. Now lets continue to the last level!
Here Comes Level 3
1. Bypass the root detection
As usual lets try to bypass the root detection scheme, we can try to tamper the code located in “sg.vantagepoint.util.RootDetection” using this frida script.
Java.perform(function(){
	var a_function = Java.use("sg.vantagepoint.util.RootDetection");
	a_function.checkRoot1.implementation = function(){
		console.log("Tamper function a");
		return false;
	}

	a_function.checkRoot2.implementation = function(){
		console.log("Tamper function b");
		return false;
	}

	a_function.checkRoot3.implementation = function(){
		console.log("Tamper function c");
		return false;
	}

});
But unfortunately if you try to run the script you will get this error:

hmmm what the hell is going on?
Try to scroll down little bit and try to find following piece of error detail. You will find a function named “goodbye” from libfoo.so library.

This error tell us that there is error in the libfoo.so(native library) file used by the app. Lets try to reverse engineer the library using “Ghidra”
After you load the app, go to the “symbol tree” section in ghidra and filter the function so we can find “goodbye” function.
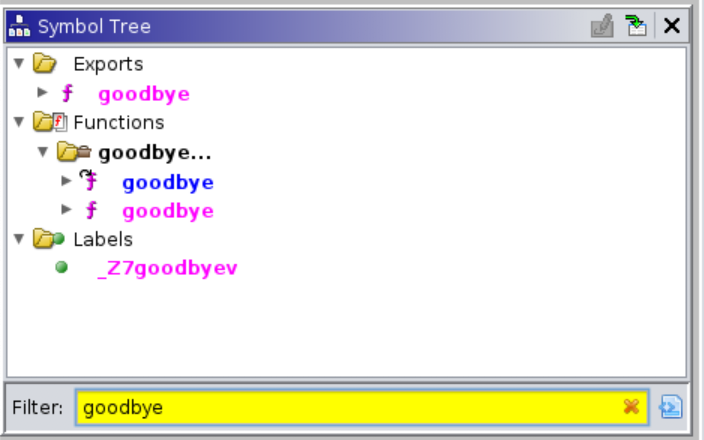
Go to the function by clicking it and you will end up in this source code:

It seems the goodbye function only purpose is to exit the program after sending signal with value 6 which equivalent for SIGABORT to abort the execution of program. Lets try to cross-reference the function to know who called this function.
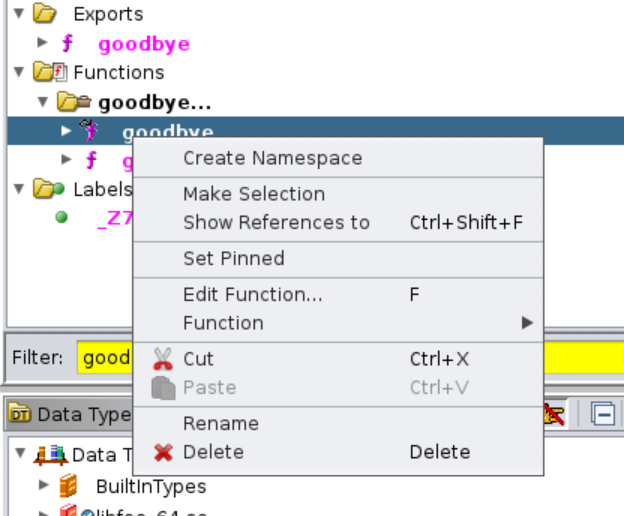

Following the reference, we will end up in unnamed function, like below:
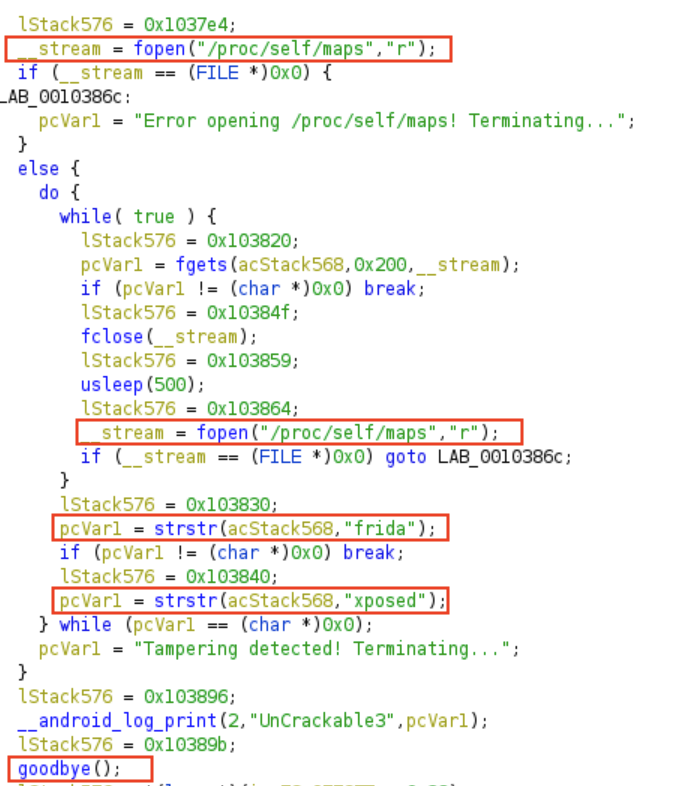
Ghidra has capability to generate pseudocode based on the assembly instruction which is pretty neat that could saved us a lot of time analyzing the code. To make sure you are not overwhelmed with the code, I highlighted the most important code in the function.
Basically this function check for the presence of xposed and frida tools in the process. It open /proc/self/maps by using fopen() and check whether it contains string of “frida” and “xposed” using strstr(). If there is frida or xposed inside the file it will break from the loop and execute “goodbye” function which cause our app to crash. More details of binary protection on android can be check in this link
So that we know how the root detection work lets try to create a frida script that will bypass this mechanism.
Java.perform(function(){
        var a_function = Java.use("sg.vantagepoint.util.RootDetection");
        a_function.checkRoot1.implementation = function(){
                console.log("tamper function 1");
                return false;
        }

        a_function.checkRoot2.implementation = function(){
                console.log("tamper function 2");
                return false;
        }

        a_function.checkRoot3.implementation = function(){
                console.log("tamper function 3");
                console.log("tampering secret");
                attachSecret();
                return false;
        }

        Interceptor.attach(Module.findExportByName("libc.so","strstr"),{
                onEnter: function(args){

                },onLeave: function(retval){
                        retval.replace(0);
                }
        });

});
We used the same approach as we already done it in the previous level, we used “Interceptor.attach” function to tamper the strstr check in the native library and to find the correct pointer we will used “Module.findExportByName” function(another neat alternative function for frida to find correct function pointer at runtime). Remember! strstr() is from standard library libc.so, thus, we can hook it before libfoo.so is loaded at runtime. Thanks for nibarius blog to give me clear explanation on this.
2. Getting the Secret String
Lets try to understand the flow of decryption process. We start a the “sg.vantagepoint.unrackable3.MainActivity”
The following is the source code that check our input with the secret string. Our string actually passed to function named “this.check.check_code()” and at the bottom of function we also found an initialization of native library(libfoo.so).
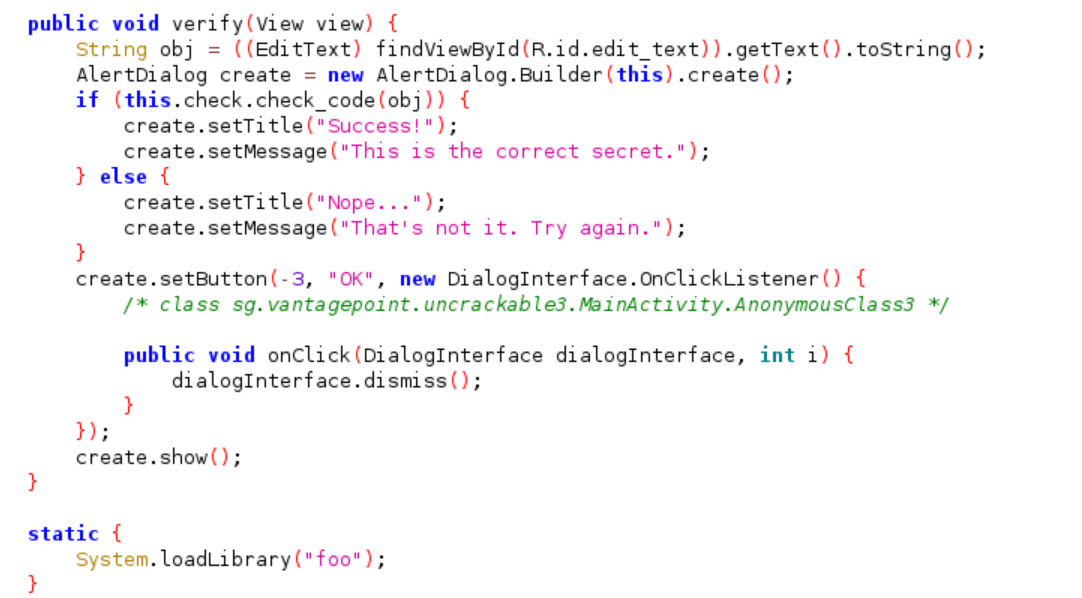
Looking at the beginning of the source code we identify some interesting code:

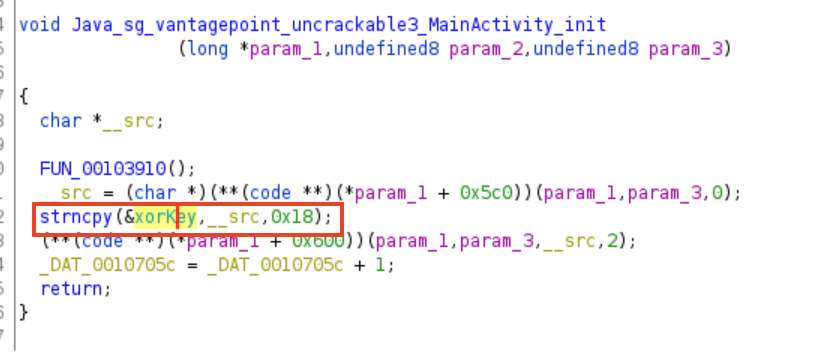
Several native function already initialized and called at the beginning of app, for example: function native init is called at onCreate() function and it used the variable xorkey as the parameter.

Whereas native function baz() is called in verifyLibs() function to check the integrity of the library. We don’t have to worry with this function since we don’t edit the actual native library.

Finally, our “this.check.check_code()” function is initialized with “private CodeCheck check”. Let’s go to CodeCheck and analyse the source code:
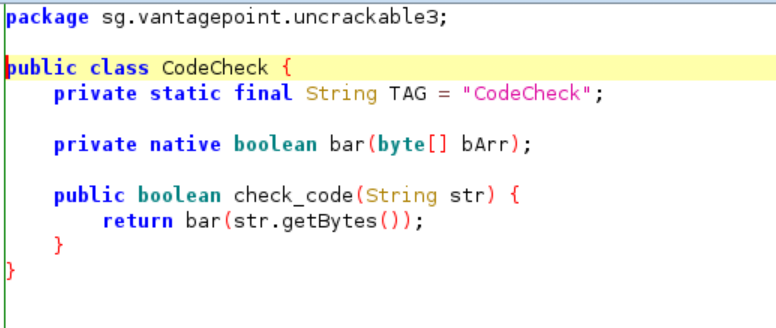
Inside the check_code() function it used another function named bar() to check our input. Lets continue the analysis to the native library using Ghidra. Looking at the result of symbol tree in Ghidra, we got 3 main native functions and we already encounter this in the Java source code.

First, lets try to analyse the MainActivity_init function, since this is the first native function that was called in the app. Basically it’s just stored the parameter which is in this case “pizzapizzapizzapizzapizz” to a global variable. To make this more readable I changed the global variable named to xorKey.
Next, go to the CodeCheck_bar function. For the sake readability I changed the variable named and function named based on my analysis. Roughly speaking, the function create an empty variable named secretkey and generated its input using function named keyGenerator that will be compared to user input. Then we need to make sure that our input is string with length of 24.
As we go further down the road, our input is iterated and compare with XORed value between xorKey and secretKey.
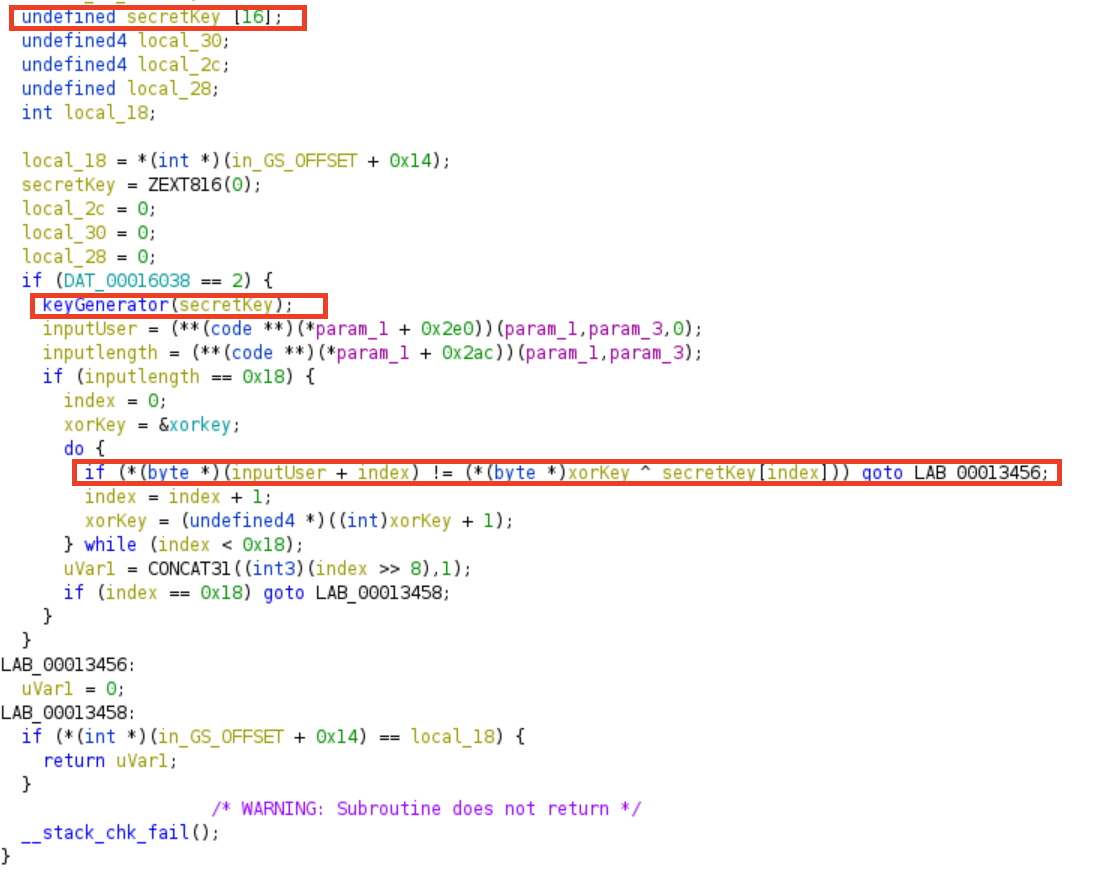
So what function do we need to tamper in frida, in my opinion the most efficient one is the keyGenerator function. Lets update our frida script like below:
Java.perform(function(){
        var a_function = Java.use("sg.vantagepoint.util.RootDetection");
        a_function.checkRoot1.implementation = function(){
                console.log("tamper function 1");
                return false;
        }

        a_function.checkRoot2.implementation = function(){
                console.log("tamper function 2");
                return false;
        }

        a_function.checkRoot3.implementation = function(){
                console.log("tamper function 3");
                console.log("tampering secret");
                attachSecret();
                return false;
        }

        Interceptor.attach(Module.findExportByName("libc.so","strstr"),{
                onEnter: function(args){

                },onLeave: function(retval){
                        retval.replace(0);
                }
        });

        function attachSecret(){
                Interceptor.attach(Module.findBaseAddress('libfoo.so').add(0x0fa0),{
                        onEnter:function(args){
                                this.secretKey = args[0];
                        },onLeave:function(retval){

                                console.log("Secret Key Generated:");
                                console.log(
                                        hexdump(this.secretKey,{
                                                offset:0,
                                                length:0x18,
                                                header:true,
                                                ansi:true
                                        })
                                );
                        }
                });
        }


});
Just like the previous like, we create a new function that will be responsible for sniffing the parameter of the keyGenerator() function. Since the parameter that passed is a pointer we just need to copy the value in frida(this.secretKey = args[0]) and output the result after the function is done with operation in onLeave. A nice little trick from nibarius blog to print the value in hexdump format.
When you run the script and submit the input you will get the following result. Note: make sure the input have the length of 24.
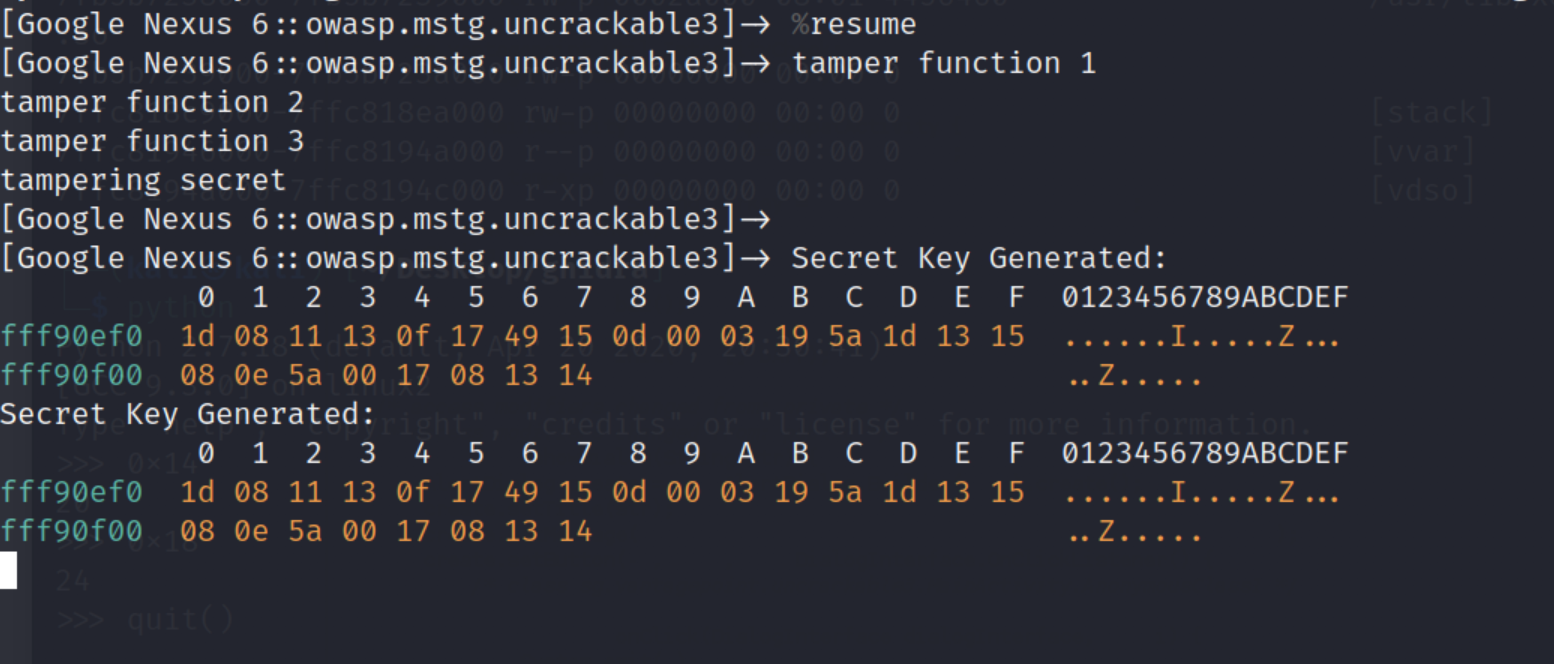
If you try to submit the input couple of times, the secret key always stay in the same value. Now that we got the secret value lets try to xored in the frida script. Lets push final update to our frida script, like this:
Java.perform(function(){
        var a_function = Java.use("sg.vantagepoint.util.RootDetection");
        a_function.checkRoot1.implementation = function(){
                console.log("tamper function 1");
                return false;
        }

        a_function.checkRoot2.implementation = function(){
                console.log("tamper function 2");
                return false;
        }

        a_function.checkRoot3.implementation = function(){
                console.log("tamper function 3");
                console.log("tampering secret");
                attachSecret();
                return false;
        }

        Interceptor.attach(Module.findExportByName("libc.so","strstr"),{
                onEnter: function(args){

                },onLeave: function(retval){
                        retval.replace(0);
                }
        });

        function attachSecret(){
                Interceptor.attach(Module.findBaseAddress('libfoo.so').add(0x0fa0),{
                        onEnter:function(args){
                                this.secretKey = args[0];
                        },onLeave:function(retval){

                                console.log("Secret Key Generated:");
                                console.log(
                                        hexdump(this.secretKey,{
                                                offset:0,
                                                length:0x18,
                                                header:true,
                                                ansi:true
                                        })
                                );
                                var xorKey = new Uint8Array([112, 105, 122, 122, 97, 112, 105, 122, 122, 97, 112, 105, 122, 122, 97, 112, 105, 122, 122, 97, 112, 105, 122, 122])
                                var result = new Uint8Array(new ArrayBuffer(24));
                                var arrayKey = new Uint8Array(this.secretKey.readByteArray(24));

                                for(let index=0; index < xorKey.length; index++){
                                        result[index] = xorKey[index] ^ arrayKey[index];
                                }
                                console.log("Secret key: " + String.fromCharCode.apply(null,result));
                        }
                });
        }


});
To XORed the secret key, I need to convert the xorKey(pizzapizzapizzapizzapizz) into an array of integer, we can simply do this with a python code.

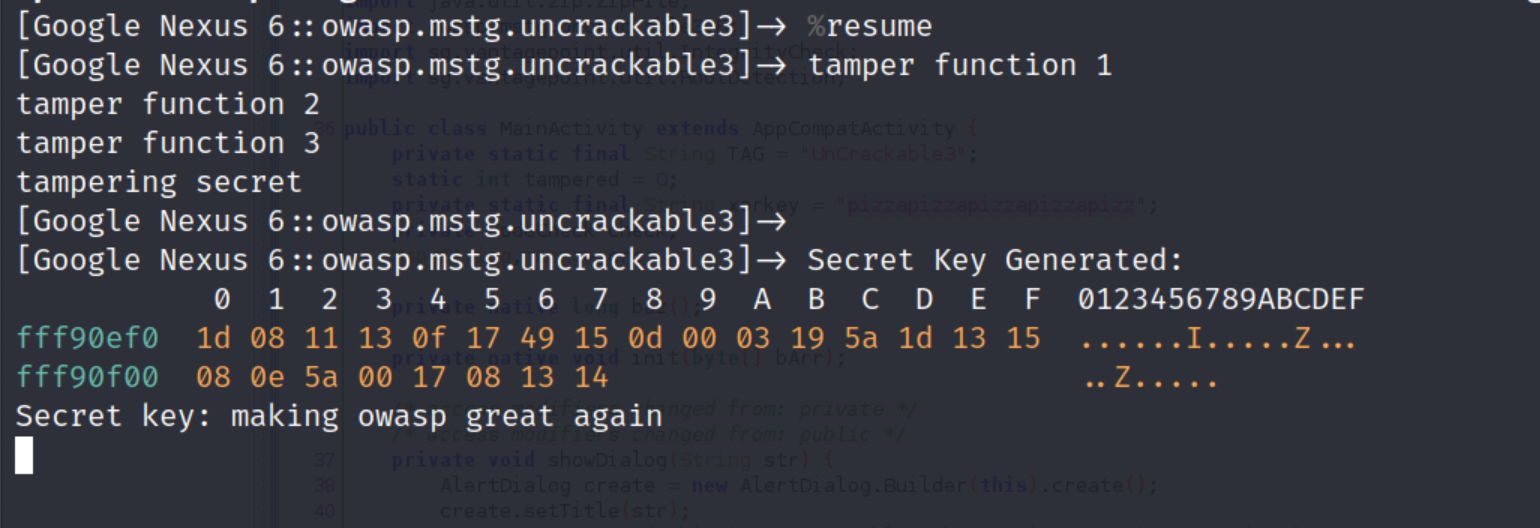
The rest is pretty clear we just need to iterate in every value and xored it. Run the script and you will got the following result.
Cool! so thats all for this post, I hope you enjoy it and stay tuned for more cybersecurity post.